


Do you ever wonder how bakers get that big, beautiful lift in their loaves? That’s called oven spring—the rapid rise that occurs in the first few minutes of baking. Today, we’ll show you how to achieve it thanks to the Challenger Bread Pan’s patented design.
Coil Fold
Pre-Shape & Bench Rest
Please email us at
hello@challengerbreadware.com with your
comments and questions.
Here’s the science: As heat hits the dough, the yeast produces a final burst of carbon dioxide, while moisture in the dough turns to steam. Together, they expand the loaf before the crust sets.
The Science of Lift: Yeast + Steam = Oven Spring
Oven spring doesn’t happen by chance. It’s the result of several factors working in harmony: strong dough development, careful shaping, a fully preheated oven and pan, and enough steam to keep the crust flexible while the loaf expands.
Set Yourself Up for Success
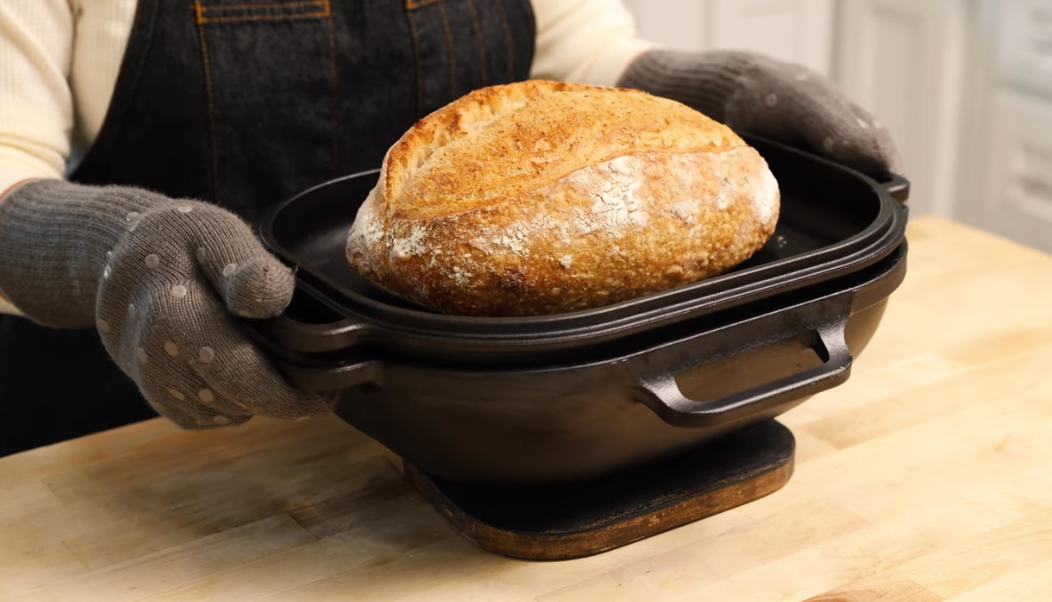
That’s where the Challenger Bread Pan makes all the difference. Unlike a Dutch oven, it’s designed specifically for baking bread. Its shallow base makes loading smooth and protects your dough’s structure. The domed lid traps steam and radiant heat, while thick cast iron delivers the intense, even heat needed for dramatic oven spring.
Built for Better Lift
Now that you know the science and the tools, here’s how to set yourself up for oven spring success and get the most from your Challenger Bread Pan. If you’re new to using the Challenger Bread Pan, it may be helpful to start with our Keep It Simple Sourdough recipe:
Step 1: Preheat Oven + Pan
Preheat fully. Always preheat your oven and the pan together. This ensures the cast iron is primed to deliver immediate, even heat.
Step 2: Load with Care
Transfer your shaped loaf onto the shallow base. The low sides make loading smooth so you don’t risk collapsing the dough’s structure.
Step 3: Score
Score your bread. Use your lame or a razor blade to cut ¼–½ inch deep at a 20–30° angle. This guides controlled expansion and creates that signature ear.
Step 3: Add Steam
For that signature Challenger oven spring, toss a few ice cubes into the hot base before covering. This creates additional steam to maintain crust flexibility as the loaf rises.
With these simple steps, the Challenger Bread Pan sets you up for reliable oven spring— and bread that rises higher, with a beautiful crust and airy crumb.
What do you do when you want enhanced flavor and texture in your bakes, but don’t have a sourdough starter ready to go? Make a poolish!
Perfect Your Crust with the Challenger Inversion Method.
Perfect Your Crust with the Challenger Inversion Method.
Be the first to know! We’ll send out emails with new products and promotions – as well as recipes and baking tips.